-
rs5045100
- Posted on
- Categories:Blog
- 0 comments
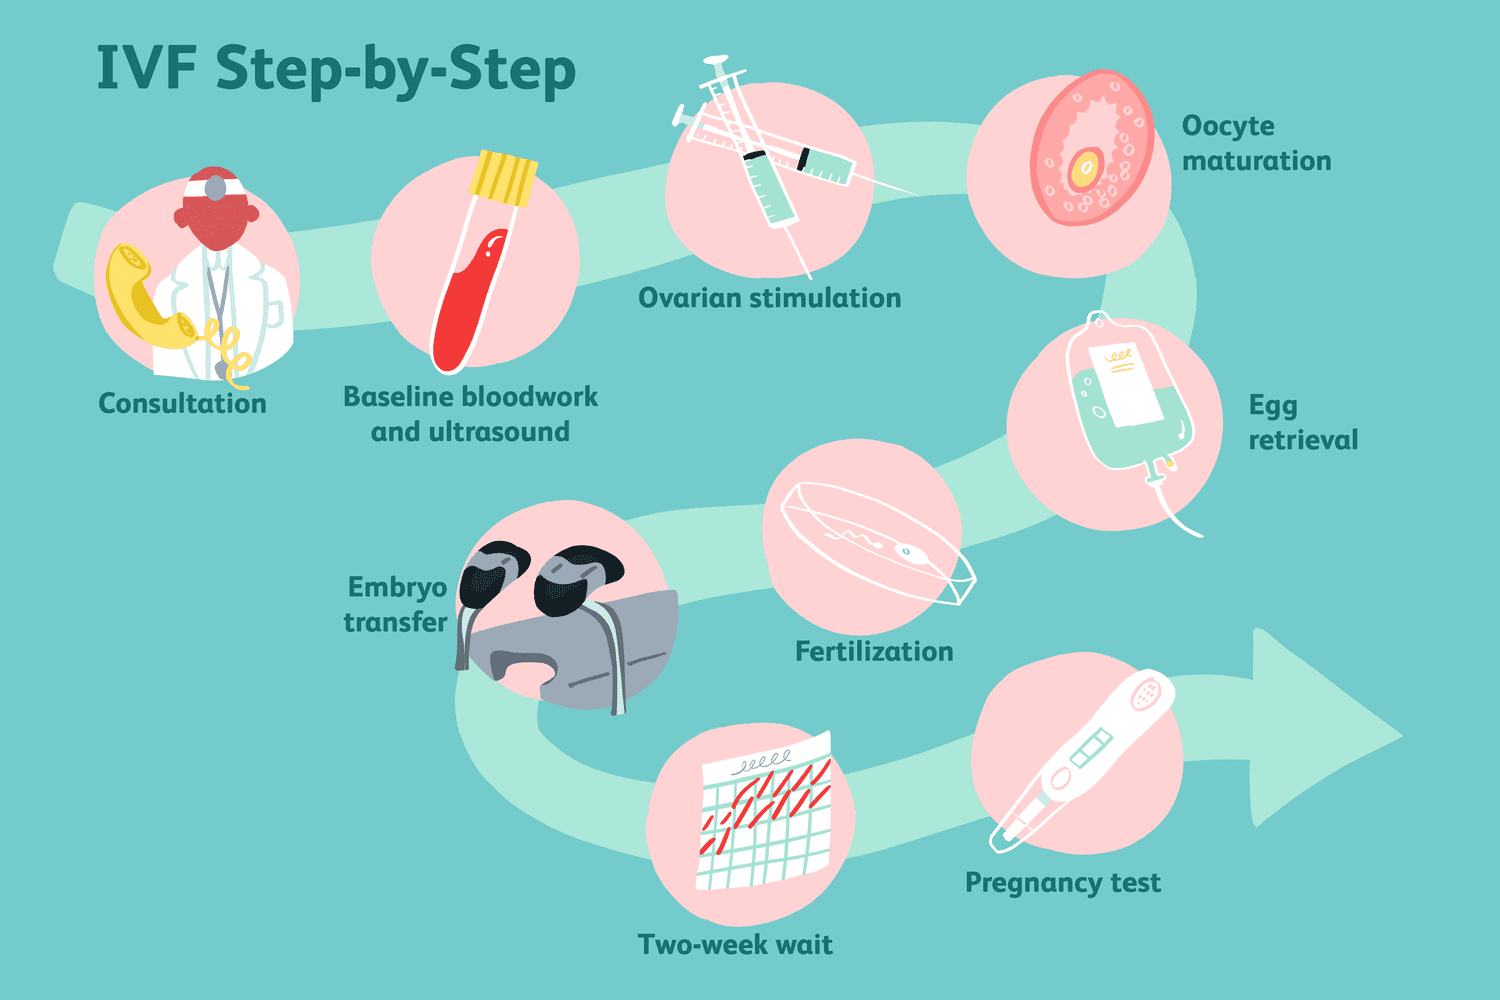
In-vitro fertilization (IVF) is one of the most effective treatments for infertility, helping countless couples achieve their dream of starting a family. Despite its popularity, the IVF process can seem complex and daunting to those unfamiliar with it. This blog breaks down the IVF process step-by-step, providing a clear understanding of what to expect from initial preparation to embryo transfer and beyond.
Step 1: Initial Consultation and Pre-Treatment Preparation
The first step in the IVF journey is a comprehensive consultation with a fertility specialist. During this visit:
- Medical History Review: The doctor will evaluate your and your partner’s medical history, including any previous fertility treatments, surgeries, or health conditions.
- Fertility Testing: Basic fertility tests, including blood tests, hormone level assessments, and ultrasound scans, help determine your fertility status and tailor the treatment to your needs.
- Treatment Planning: Based on the test results, the doctor will design a personalized IVF plan. You may also receive instructions on lifestyle changes, dietary recommendations, or supplements to optimize treatment success.
Step 2: Ovarian Stimulation
Once the treatment plan is finalized, the next stage is ovarian stimulation. This phase involves stimulating the ovaries to produce multiple mature eggs for fertilization, rather than the single egg released in a typical menstrual cycle.
- Medications: You’ll take hormonal injections (usually FSH and LH) for about 10–14 days. These hormones encourage the ovaries to produce multiple eggs.
- Monitoring: During stimulation, you’ll have regular blood tests and ultrasounds to monitor hormone levels and track follicle growth. The doctor will adjust medications as needed to ensure optimal response.
- Trigger Shot: When the follicles reach a certain size, a final injection, called a “trigger shot,” is given to mature the eggs and prepare them for retrieval.
Step 3: Egg Retrieval
Egg retrieval is a minor surgical procedure, typically performed 36 hours after the trigger shot.
- Procedure: Using ultrasound guidance, a thin needle is inserted into the ovaries through the vaginal wall to collect the mature eggs. This process usually takes about 20–30 minutes.
- Anesthesia: The procedure is done under mild sedation or anesthesia to ensure comfort.
- Recovery: Most women can resume normal activities the following day, although mild cramping or spotting may occur.
Step 4: Sperm Collection and Fertilization
On the same day as the egg retrieval, your partner (or a sperm donor) will provide a sperm sample, which is processed in the lab to isolate the healthiest sperm for fertilization.
- Sperm Preparation: The sperm is processed to enhance quality and improve the chances of fertilization.
- Fertilization Methods: Depending on the couple’s needs, one of two fertilization methods will be used:
- Traditional IVF: The eggs and sperm are placed in a petri dish, allowing fertilization to occur naturally.
- ICSI (Intracytoplasmic Sperm Injection): A single sperm is directly injected into each egg, commonly used for cases with male infertility.
After fertilization, the embryos begin to grow in a controlled environment in the lab.
Step 5: Embryo Development and Selection
The fertilized eggs, now called embryos, are monitored for several days to assess their development.
- Embryo Grading: Embryologists evaluate the embryos for quality and growth rate. Healthier embryos are more likely to result in a successful pregnancy.
- Blastocyst Stage: By day 5 or 6, embryos reach the blastocyst stage, at which point they are typically ready for transfer or freezing.
Step 6: Embryo Transfer
Embryo transfer is a straightforward, minimally invasive procedure in which the selected embryo(s) are placed into the uterus.
- Procedure: A thin catheter is used to place the embryo(s) into the uterus. This is generally painless and does not require anesthesia.
- Number of Embryos: Based on your age and treatment plan, the doctor will determine how many embryos to transfer to maximize success while minimizing the risk of multiple pregnancies.
- Post-Procedure Rest: Most doctors recommend rest for a few hours post-transfer, although some suggest resuming light activities soon after.
Step 7: Post-Transfer Care and Waiting Period
Following the transfer, there is a two-week waiting period before taking a pregnancy test.
- Lifestyle Guidelines: During this time, it’s crucial to follow any advice given by your doctor, such as avoiding strenuous activities, maintaining a balanced diet, and taking any prescribed medications.
- Medications: You may be prescribed progesterone to support the uterine lining and increase the likelihood of embryo implantation.
- Managing Emotions: The waiting period can be emotionally challenging, and it’s important to seek support or counseling if needed.
Step 8: Pregnancy Test and Next Steps
About 10–14 days after the embryo transfer, a blood test (beta hCG) is performed to confirm pregnancy.
- Positive Result: If the test confirms pregnancy, you’ll continue with regular follow-up appointments to monitor the embryo’s development.
- Negative Result: If the test is negative, your doctor will discuss possible reasons and next steps. Many couples undergo multiple IVF cycles to achieve pregnancy.
Final Thoughts
The IVF process can be intense, but understanding each step can help ease some of the anxiety. With a knowledgeable fertility team and a strong support system, couples can navigate the IVF journey more confidently. The process may not be easy, but with perseverance and professional guidance, IVF offers a valuable path toward achieving a healthy pregnancy and fulfilling the dream of parenthood.
For couples considering IVF, consulting a fertility specialist early and understanding the steps involved can make a significant difference. By knowing what to expect, you can prepare both physically and emotionally, making this journey a bit smoother and more hopeful.